leaf icon
leaf icon
leaf icon
calendar icon
Gardens To Visit
caret icon
Visit a PHS garden or landscape to help build stronger social connections with your community.
For Neighborhoods
caret icon
Explore programs that create healthy, livable environments and increase access to fresh food.
For Gardeners
caret icon
About Us
caret icon
Get to know our story, become a part of our staff, or see what is in the news with PHS.
The Flower Show

How to Build a Dead Hedge: A Wildlife-Friendly Garden Barrier

August 20, 2026

leaf icon gardening projects

leaf icon sustainable gardening

dead hedge 4

By Andrew Bunting, PHS VP of Horticulture 

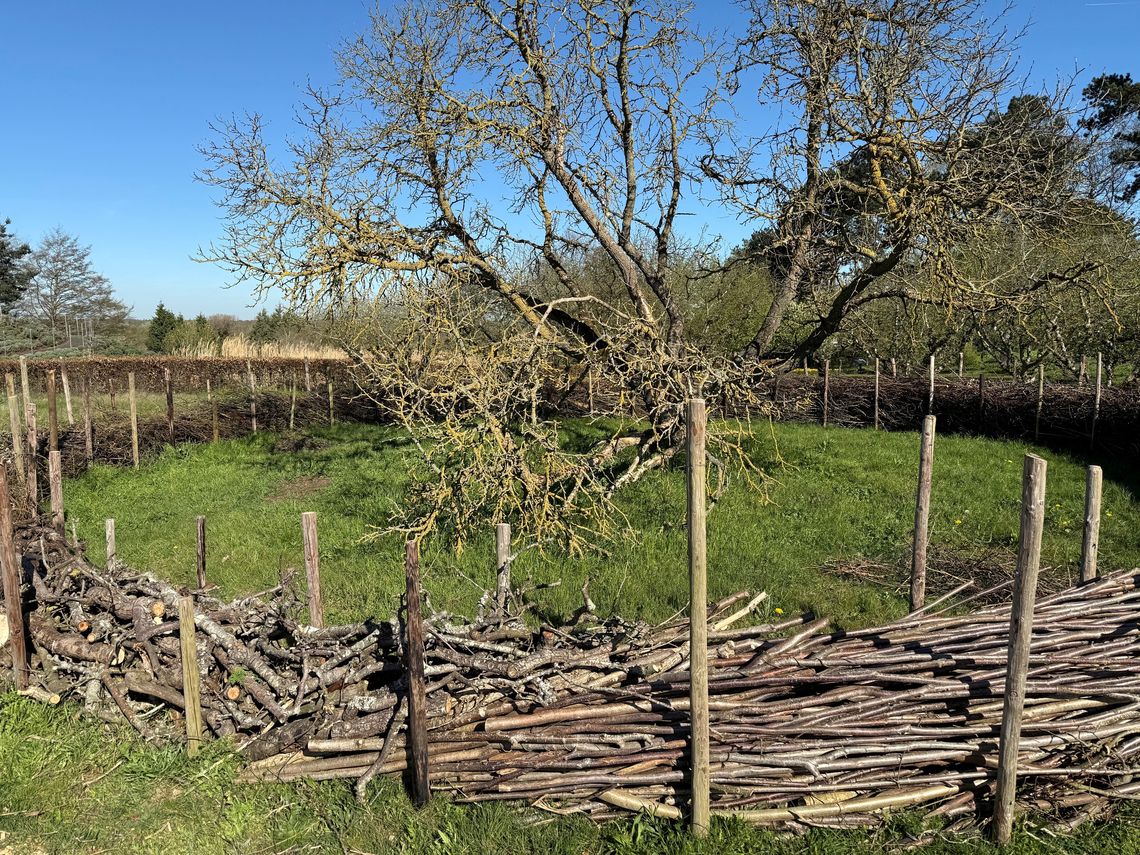
Learning how to build a dead hedge is a simple way to make your garden more sustainable while putting fallen branches and other garden debris to good use. In recent years, gardeners have embraced creative approaches to reduce waste and maximize the ecological impact of their gardens. Traditionally, brush, twigs, and sticks are put out with the trash or burned in the backyard. A dead hedge offers a more sustainable alternative by turning garden waste into a functional and attractive feature that can support wildlife. 

What Is a Dead Hedge or Ecological Brush Pile? 

The easiest way to build a dead hedge is to stack branches, perennial stems, and ornamental grasses that are cut back in the fall or spring between upright supports. Supports can be made from steel rebar, wood stakes, or even thick tree trunks or branches. The garden debris layered between them creates a "hedge" or fence that can mark a boundary, screen an area, or become an ornamental structural feature in the landscape. Over time, the branches and perennial stalks decompose, and new material can continually be added, creating an ever-evolving haven for wildlife.

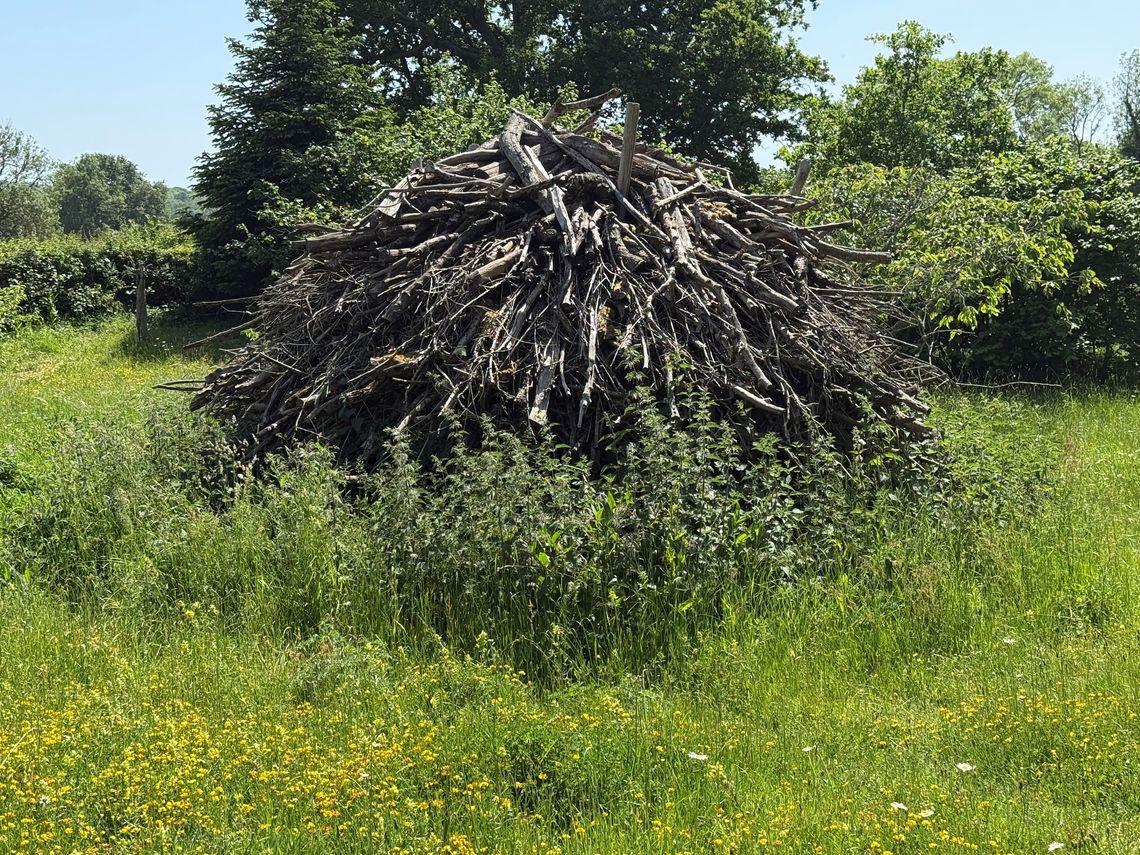
An ecological brush pile is another way to use woody garden debris to create wildlife habitat. Rather than being constructed as a hedge or fence, a brush pile can simply be stacked in a designated area of the garden.

eco pile great dixter
An ecological brush pile creates valuable wildlife habitat while giving garden debris a useful second life.

Dead Hedge Benefits for Wildlife and Sustainability 

A dead hedge offers many ecological benefits. By keeping these natural materials in the garden, they are diverted from landfills and reduce the fossil fuels needed for transportation, shredding, and chipping, helping to minimize your garden's carbon footprint. Pollution is also prevented by not burning this garden waste. 

Almost immediately, the stacked hedge becomes a wildlife habitat garden, supporting local biodiversity by providing nesting sites and places to shelter and overwinter. It is an attractive habitat for songbirds such as the Carolina Wren, House Wren, Gray Catbird, Song Sparrow, and Northern Cardinal. The dead hedge also offers small mammals like the Eastern Chipmunk both habitat and safe passage across the garden. Decaying wood also supports an abundant and diverse insect population, including many species of beetles. Amphibians such as the American Toad and Eastern Red-backed Salamander also find refuge within the dead hedge. 

Wind Protection, Soil Health, and Natural Garden Borders 

A dead hedge can help create microclimates in the garden by protecting nearby plants from wind. It also helps reduce soil erosion, and as the lower portions gradually decompose, nutrients are returned to the soil. These ecological garden borders are both functional and beautiful, adding structure while supporting the surrounding ecosystem. 

dead hedge 3
Dead hedges are a great way to add an ecologically friendly focal point to your garden.

Creating Garden Art with a Dead Hedge 

A creatively assembled dead hedge can become an attractive piece of organic art in the garden. This concept of repurposing what was commonly thought of as garden debris into a focal piece of art in your garden is quickly catching on.  

Local gardener in Rose Valley, Roger Latham, has created a large rectangular cube from debris generated in his own personal garden. While the famed public garden, Chanticleerhosted a class with Kevin Williams of the Denver Botanic Gardens on creative dead hedge construction.  

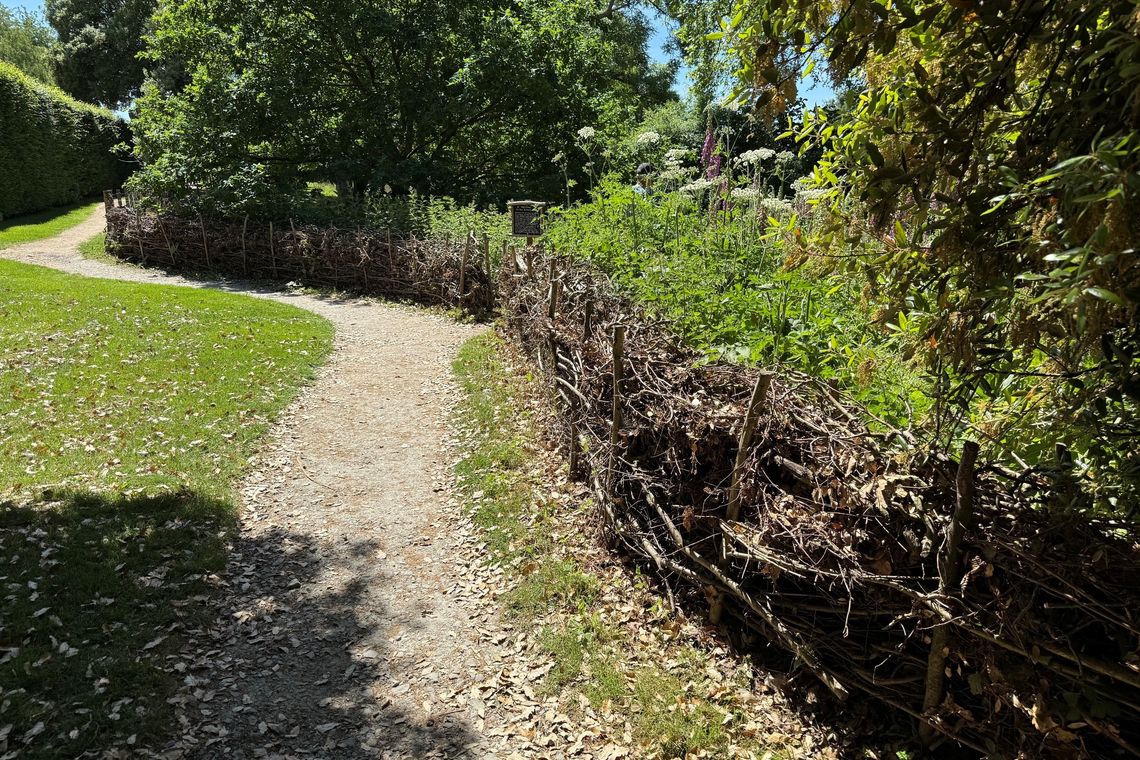
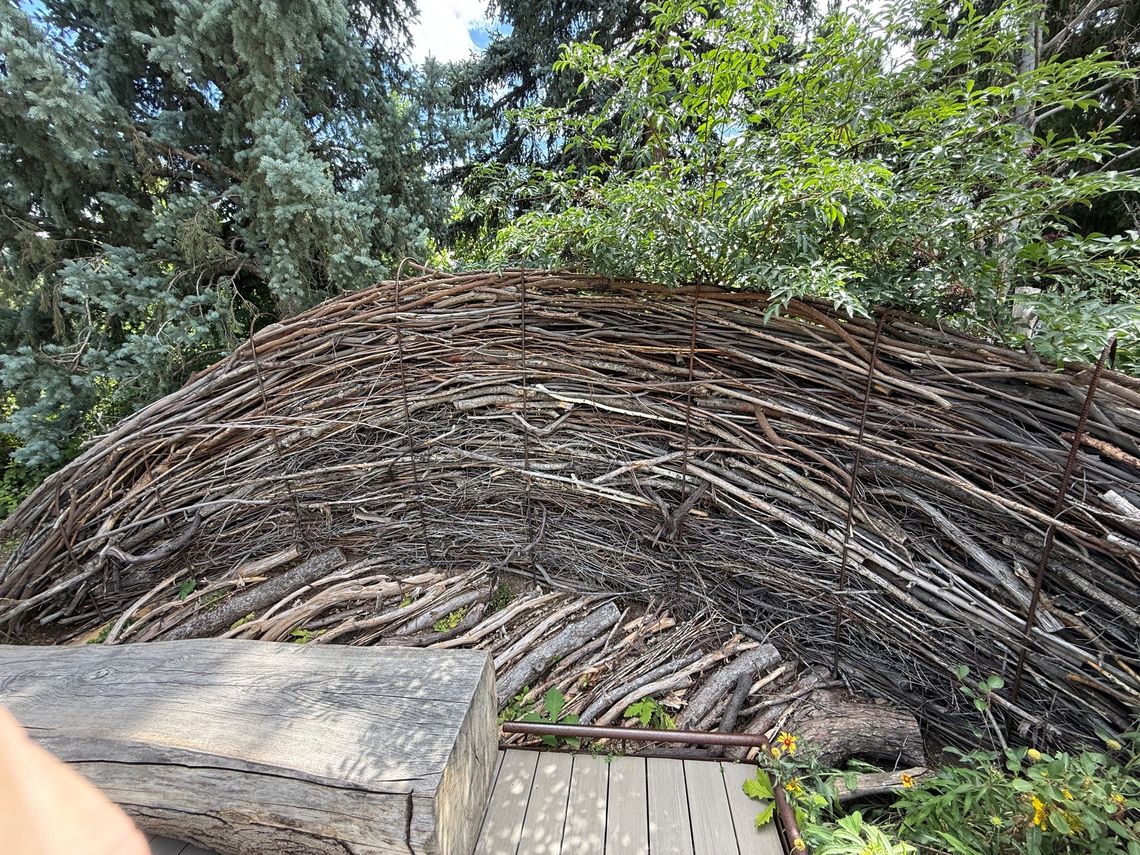
During a recent visit to Hidcote Gardens in the Cotswolds of England, I saw a dead hedge woven into a serpentine border surrounding a naturalistic garden. Dead hedges can also be constructed with undulating high and low points, and the materials themselves create interesting textures throughout the seasons. 

dead head denver botanic garden 3
A dead hedge at Denver Botanic Gardens shows how branches and garden debris can be creatively arranged into an eye-catching landscape feature.

How to Build a Dead Hedge 

Step 1: Find the Most Desirable Location

Choose an area where you want to create a boundary, natural fence, or screening element. A dead hedge works well in perennial or shrub gardens as an architectural feature, and it is also an attractive way to screen utilitarian spaces such as compost piles or storage areas, making it an excellent form of sustainable garden fencing. 

Step 2: Gather Materials for the Dead Hedge 

Branches that have been pruned or fallen can be stacked or woven into the dead hedge. Every twig can be used. Cut material from perennial gardens, including ornamental grasses, also makes excellent building material. Pinecones and seed heads can be tucked into crevices where they provide food for birds and mammals. Annual hedge trimmings are another ideal addition. 

Unlike traditional brush pile alternatives, a dead hedge organizes this material into a purposeful garden feature. Avoid adding food scraps or fresh grass clippings, as they decompose too quickly. The goal is for the materials to break down gradually over a similar timeframe. 

Step 3: Select Posts or Stakes 

Wooden tree stakes are readily available at most home improvement stores. Their pointed ends make them easy to drive into the ground, and they are typically six feet long and 1½ inches square. Straight branches can also be used, especially naturally rot-resistant species such as pine, cedar, or arborvitae. 

Many gardeners choose rebar because it is durable, relatively inexpensive, and available in a variety of lengths and diameters. A width of ⅜ to ½ inch generally provides good structural support. 

Step 4: Setting the Stakes in the Ground 

Once you select your staking material, you will have to set them in the ground. Space your stakes 3 to 5 feet apart. Install the upright posts or rebar approximately 1½ to 2 feet apart across the width of the hedge. Spacing can be tighter or wider depending on the size of the materials you will be placing between the stakes. Avoid making the hedge excessively wide, as this can reduce its structural stability. 

Pound the two parallel rows of stakes into the ground. For hard or rocky soil, 12 inches is usually sufficient if the ground is compact. For softer soil, aim for about 18 inches deep to prevent shifting. 
Step 5: Construct the Dead Hedge 

  • Layer the base: Place your heaviest, bulkier logs and thickest branches at the bottom of the channel to build a stable foundation. The large, irregular logs create sturdy, low-level gaps that let air circulate, preventing the very bottom from rotting. The spaces between the large logs also provide shelter for ground-dwelling mammals, reptiles, and amphibians. Continue stacking additional material, using the longest branches around the outside to create a cradle that holds the smaller branches and twigs in place. 
  • Pack the middle: Fill the core with smaller twigs, leaves, and medium-sized brush. Stomp or press down on the materials frequently to reduce air gaps and compact the structure. This step will help prevent collapsing: by tightly packing twigs and leaves, you lock the larger branches together so the hedge does not lean or fall over. A tightly packed middle also creates wildlife shelter by providing safe nesting spots and winter protection for beneficial insects and birds. The dense packing also traps moisture and heat that speeds up natural decay at the bottom of the hedge while keeping the top looking neat. 

Step 6: Maintain the Dead Hedge 

One of the greatest advantages of a dead hedge is that it can be built over time. Whenever you prune shrubs, peel invasive ivy from a tree, or cut back perennials, simply add the material to the hedge.  

As time passes, portions of the dead hedge will naturally decompose. Pressing gently on the top of the hedge helps compress the material, and occasionally repositioning branches can help fill gaps and maintain its shape. If necessary, sections can be rebuilt. 

To keep the hedge looking tidy, prune any wayward branches and simply add them back into the structure. Upright posts may shift over time and occasionally need to be driven farther into the ground or replaced. 

For additional beauty and habitat value, consider treating the dead hedge like an arbor by planting native vines such as coral honeysuckle (Lonicera sempervirens) or Virginia creeper (Parthenocissus virginiana) to climb over it. 

A Sustainable Addition to Any Garden 

The dead hedge is one of the most effective ecological features you can add to your landscape. It diverts garden waste from landfills while creating a myriad of habitats—a true "hotel" for native wildlife. There is also a strong creative element to building dead hedges. They can be simple and utilitarian or carefully designed as natural works of art. Whether they occupy a small corner or stretch across an entire property, dead hedges are an easy way to make your garden more sustainable while supporting biodiversity. 

Try building a small dead hedge in your own garden and share your results with us on social media @phsgardening

Learn from horticultural experts through upcoming Know to Grow webinars on gardening, plants, design, and more.